
Completing a Braille Music Notation Training Program
The basic method of completing a Braille Music Notation Training Program is similar to that of completing a UEB Training Program as described in How to complete a UEB Training Program however there are some differences which are noted in this tutorial.
Lesson Content
Throughout the lessons, examples of bars of music with the corresponding braille are used to describe the various concepts being taught.
Each example is presented with a stave and the musical notes on it as a visual image followed by the corresponding braille representing what is displayed as the standard presentation. To assist our students who cannot understand or see the music notation a number of additional help items have been provided for each example as listed below.
Music Player
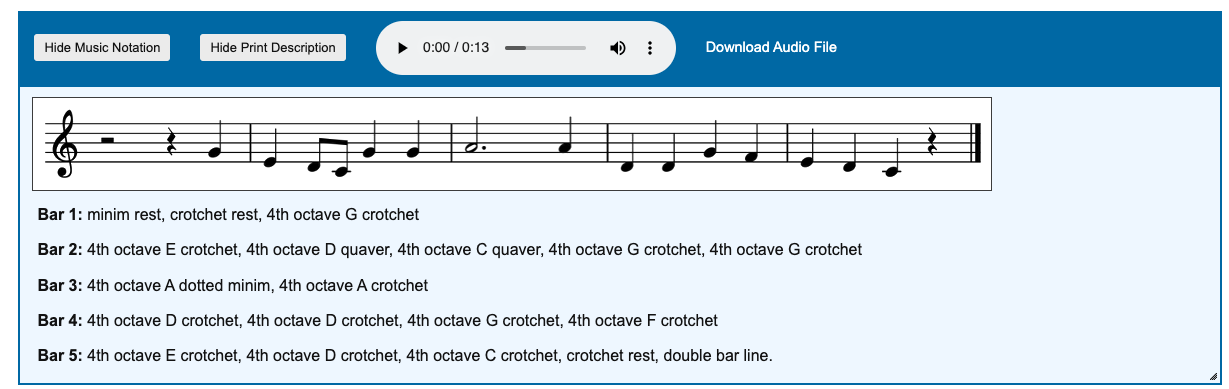
Where available, an embedded music player has been provided just above the stave which can be used to play the music example audibly to the student in case hearing the music assists their understanding. Next to the music player is a link to download the music sample as an MP3 file. This allows a user to choose whatever program they want to play the music file in case they have difficulties using the music player embedded in the browser.
Print Description
Underneath the stave image in the music example there is a Show Print Description link which can be used to expand a section on the page showing the music in words. For example, a bar could be described as fourth octave A minim, fifth octave G quaver.
If you cannot see or understand the music, this is an alternative way to understand what the music stave image has on it. The description is not shown by default to avoid cluttering up the page and adding lots of reading to the screen reader. However by clicking on the link to show the description it becomes visible. The link will change to say Hide Print Description which can be used to hide it again when you have finished with it.
Next to the Show Print Description link is a link to download the print description. As for the music player, this is provided in case a student would prefer to download the description into a program of their choice for reading. The downloaded print description is a standard ASCII text file which can be read by a screen reader.
BRF Files for Examples
In Non Visual Mode, the braille for each music example is shown as either Unicode Braille or as a series of dot patterns which are read out by the screen reader. To allow a student to be able to examine the braille in a program of their choice we also provide a link to download the BRF file of the example. This immediately follows the Unicode braille or spoken dot pattern for each example.
Screen Reader Settings
For users who have their Exercise Completion Mode set to Non Visual Access an additional button is supplied at the top of the page above the lesson content. The button is called Screen Reader Settings.
Click this button to open a page allowing some changes to the way the lesson is presented which are designed to work with how you use your screen reader.
The only supported option at present is the Braille Display Method, allowing you to select Unicode Braille as a method to show the braille in the lesson examples. Further instructions are on the Screen Reader Settings page if you want to know more about unicode braille.
Exercise Hints
At the end of each lesson description, there is a section called Exercise Hints. This is an important section and must be read for each lesson. It describes any new concepts introduced for completing exercises in this lesson and any tips and tricks that might be needed for lesson completion.
IMPORTANT: The Braille Music lessons have a variable number of exercises per lesson. The Exercise Hints will tell you how many exercises need to be completed in that lesson before you can move onto the next lesson.
Exercise Completion in Visual Access Mode
The basics of completing an exercise in Visual Access Mode for Braille Music Notation are the same as those for the Literacy and Mathematics UEB Training Programs.
A text area is shown and you use standard 6 key entry to type in Braille cells. Each time you type a space or an enter, the error checker is run and you are informed of any errors. There are however some differences which are worth noting.
Exercise Presentation
The exercises are based around translating music notation into braille. The music notation is presented in a number of ways to assist the student. The first is a stave image with music notes on it for those that can understand music. Underneath that is a print description of the music in the image for those that need help interpreting the music notation. Finally a sound file embedded as a music player is presented at the top of each exercise to listen to the music sample along with a link to download the audio file if that helps the student. Below is a screenshot of a typical exercise within Braille Music.
Centring Text
From Lesson 4 onwards, some of the lines to be brailled will need to be centred. You do this using the space key to type spaces before the braille to move it along the line until the line is centred.
The method for doing this would be to work out how long the line to be brailled is, subtract that from 40 and then divide that number by 2. That will give how many spaces should be brailled at the start of the line before entering the first non space cell on the line.
If a line is not centred, then an error message is shown at the start of the line. Press spaces at the start of the line until the error message disappears.

Exercise Completion in Non Visual Access Mode
The basics of completing an exercise in Non Visual Access Mode for Braille Music Notation are the same as those for the Literacy and Mathematics UEB Training Programs.
A text area is shown and you use standard 6 key entry to type in Braille cells. A screen reader is required to read out the information to be typed for each braille word or in the case of music bar. Each time you type a character the error checker is run and you are informed of any errors. There are however some differences which are worth noting.
Centring Text
From Lesson 4 onwards, some of the lines to be brailled will need to be centred. You do this using a key from the Help commands. While typing the line you want to centre, press the C key (not a braille C but the actual C key on the keyboard) while in the text box you are entering 6 key braille. This will toggle the centre mode on and the line will be centred. To turn off centre mode if you accidentally turned it on, press the C key again.
When you press enter at the end of a line, if the line has not been centred, then an error message is read out by the screen reader. To correct this press the C key to centre the line and then press enter (or return) again to move onto the next line.
Reading Next Cell to Type
Each bar to be typed in the exercise is described in print, for example: 4th octave F minim, 4th octave G minim. Depending on the length of the bar, this can be quite a lengthy and hard to remember description.
Like the UEB Training Programs, we read out the bar to be brailled when you move onto each new bar. However in Braille Music, to assist with the comprehension of what needs to be typed for a bar a new help key has been introduced using the V key on the keyboard. Pressing the V key will read the next part of the bar to be brailled, not the whole bar.
If you are struggling to remember what needs to be typed then at anytime just press the V key and it will say what you need to braille next. Then after that has been done, press V again to progress through the bar cell (or small group of cells for music notes that have multiple cells).
Pressing V at the end of the bar will say All cells typed meaning you can press space or enter to move onto the next bar.
Music Audio File
If a music audio file is available for the exercise, an embedded music player along with a link to download the MP3 file is provided at the start of that exercise. This allows the student to hear the music in case that provides them with some guidance on completing the exercises.